
Welcome to our latest blog post, where we delve into topic of riding your bike comfortably throughout winter and provide some indispensable tips for achieving the optimal winter bike fit. Whether you're a experienced cyclist or just starting your riding journey, understanding the importance of your position on the bike and how it can vary according to the season is paramount. And if you're in or near Warwickshire, you're in luck – we'll explore why seeking out our professional bike fitting service in Warwickshire can make all the difference in your cycling endeavors.
The Winter Road Bike

I've chosen a 54cm Kinesis R2 '4-Seasons' Road Bike for 2023/24 winter riding duties. The only changes from stock spec are the tyres and saddle. Kinesis are stalwarts of the British Road Riding Scene majoring on Practicality and Robustness over Glitz and Glamour.
In Great Britain, the vast difference in weather between summer and winter means that it often makes sense for cyclists to have more than one bike (as if you needed justification!).
Traditionally, for a year-round road rider, racer or time triallist, you’d have your ‘best bike’ for use in the summer and then your ‘winter bike’, or ‘hack bike’ as they were affectionately called. This was usually either a demoted ‘best bike’ (which was probably not very fit-for-purpose other than you had it already), or a proper winter bike mainly characterized by less aggressive geometry, more robust construction and, most importantly, mudguards.
Consideration #1
Mudguards
Mudguards are not cool, right? But once you’ve ridden a winter with them, you’ll never do another without and having a frame with mounts to fit proper guards is the key to winter riding success.
Why do I say that? Well, joyful cycling is all about comfort. Comfort drives everything. There is no race speed without comfort and there is no getting up in the dark on a cold, wet winter’s morning without the promise of comfort. Or, at least, minimal discomfort.
I’m not convinced that disc brakes are required on a summer road bike, but they can bring a lot of advantages to a winter road bike. For one, disc brakes usually work better in the rain than rim brakes. For two they free up a whole load of clearance for wider tyres. With rim brakes, you could only really get away with a 28mm tyre and ‘guard beneath the caliper. But with discs, there is literally no limit.
For me, riding around the roads of Warwickshire, I like a quality 700c tubeless tyre of 30-32mm width (as measured, rather than what it says on the sidewall – Gerard Vroomen calls this WAM – Width As Measured which goes hand in hand with RAM - Radius As Measured) to give me the best compromise between bump-absorption, grip and speed, in that order. Lots of focus has been provided recently on tyre width because its easy to understand and measure. Tyre height is also very important as it's the other characteristic that controls the volume of the tyre and hence the amount of air supporting your weight and absorbing irregularities in the road or trail surface. RAM is the best measure of this, but its often easier to measure the height of the tyre from the rim. If you want to find out more about WAMRAM, visit this page on the 3T website: How big is my tire? - Gravel Bike Tech - 3T Blog

Vittoria Corsa NEXT 700x30mm tubeless tyre mounted on Alex Draw rims with a 19mm internal rim width actually come out as 32mm WAM (Width As Measured).

Tyre Height comes out as 28mm for these tyres. Please excuse the parallax errors in this and some other photos.
Oh, and finally, mudguards can look very cool if they are the right ‘guards on the right bike. These are aluminium Kinesis Fend Off's. And they'd look even better with black stays.
Consideration #2
Winter Bike Geometry
A winter bike should have a more relaxed geometry. You are not racing so you don’t need that more powerful, aerodynamic position where you can’t see the road (or flooded pot-hole) ahead. You might even be inclined to engage in social club or group riding where the ability to sit upright and talk to your neighbour is more important than a 20W aerodynamic saving.
‘Relaxed Geometry’ usually means a taller head tube, longer front and rear centers (the distance between the bottom bracket and front and rear axles) and shallower angles all of which combine to create more stable handling, and space for mudguards without toe-overlap (where your shoes clash with your ‘guards when turning your front wheel).

This is what toe overlap looks like, when your front wheel / mudguard clashes with your shoe. It doesn't happen very often (usually at junctions when you are trying to balance with one foot forward whilst simultaneously making a tight turn), but its not nice when it does so do anything you can to minimize it.
Consideration #3
Winter Riding: How Flexible Are You?
Winter is cold. Winter is wet. Both these characteristics conspire to make your body less flexible. You’re also likely to be wearing thicker, water-resistant clothing which makes you even less flexible as a winter-clothed-rider system, and no cyclist should be unclothed during winter riding.
Consideration #4
What is the Best Bike Fit for Your Winter Bike?
So, we finally come to the meat of the topic, "What is the Best Bike Fit for Your Winter Bike?"
If we return to the traditional year-round road rider mentioned at the beginning of this article, there were two main schools of thought when it can to the set-up or fit of their winter bike:
1. Carry over their ‘best’ or ‘race’ bike set-up to the winter bike to be acclimatized to that position when the race season starts.
2. Accept that winter riding is different to summer riding and create an optimized position
more suited to the aims of winter riding and the limits imposed by the conditions.
The advantages of Approach 2. are that you are more likely to get to the start of the summer or race season in better shape because you are less likely to have crashed. You are probably fitter because you have ridden more frequently, which perhaps also means you are more flexible and have attained a good cycling posture. And transitioning from a regularly-ridden winter position to a summer position is the work of a few weeks’ adaptation, and likely takes much less time than if you have infrequently ridden through winter in your summer position.
Approach 2. does not ignore your summer position; it just tweaks it. All good bike fits start with the feet so let’s go through each element to give you the best chance of a safe and enjoyable winter riding experience.
Consideration #5
Winter Bike Fit: Feet
Most cyclists who come to Precision Cycle Fit have their cleats positioned too far forward. Often this is imposed by the position of the cleat holes in the shoes. From a bike-fit perspective, 'more-rearward' cleats are usually more desirable than 'more-forward' cleats from an pedaling efficiency and injury prevention perspective.
But there can be some advantages of slightly forward cleats when winter riding in that this has the effect of moving your shoe rewards on the pedal thus reducing the risk of toe overlap described and demonstrated above.
Dedicated winter shoes are by necessity bulkier than summer shoes. You may also have decided to ‘size-up’ to allow space for thick socks (I do). Even if you are just wearing overshoes, the combination is bigger and therefore more likely to clash against parts of your bike, not just the guards but also the cranks and chainstays.

The shoes on the left are my summer Bont Vaypors; Beautiful shoes with a very stiff 'bathtub' carbon sole, and leather uppers. On the right are my winter road shoe; very effective water-resistant Shimano SH-RW500-SL (catchy name). They are both size 42, but externally, the Shimano's are about 15mm longer and exactly the same width.
This additional bulk can apply to the soles of the shoes as well. This is technically known as the ‘stack height’ of the shoe. For the best pedaling efficiency and for feeling ‘connected’ to the bike, a low stack height is preferred, but in winter shoes, it’s inevitably higher. Thus, your saddle height is effectively reduced when you are wearing your winter shoes, insoles and socks. In the shoes shown above there is little noticeable shoe stack height difference, but its a very difficult thing to measure and is probably best determined by riding both sets back to back inside. My thicker winter socks add a couple of mm though, resulting in a reduced 'effective saddle height'.
Additionally, more forward cleats also have the effect of reducing the effective saddle height.
But don’t despair, not yet anyway, because other elements of your winter clothing ensemble may counter-act this, and the cold weather will likely reduce your flexibility, so a lower effective saddle height may be just what you need! Unless you are one of those rare breeds who follow coaches’ advice to do core work and stretching in the off season…
…do read on…
Consideration #6
Winter Bike Fit: Undercarriage/Bottom
You’ll often be wearing thicker shorts or tights during winter. This may add a few mm to your ‘effective undercarriage’ (or bottom), which is effectively increasing your saddle height.
Saddle fore/aft position is the major driver to how balanced you are on the bike. In general, you want to be as far forward on your bike as you can be without ‘falling off the front of it’. This is especially the case for racing cyclists where this position allows improved power and aerodynamics. Similarly, triathletes often adopt a very forward seating position to enable a more open hip angle which can ease the transition from bike position to run position.
But you are unlikely to be racing in winter, so you might want to shift that saddle back a bit. This will reduce the amount of weight going through your hands (usually around 15%) as more of it is supported by your pelvis and legs. Your hands can get numb from the cold during winter so further reducing the potential for numbness by reducing the weight going through them makes a lot of sense.
If you are going to be following the traditional ‘long, slow miles’ winter riding routine, you may also want to consider a different saddle shape. A flat saddle is better for aggressive riding positions associated with power, aerodynamics, and speed. But a more upright riding position (discussed further below) may mean that a saddle with a ‘wavy’ profile is more suitable during winter. Like shoes, different saddles have different stack heights so always ensure that you take this in to account by inserting your seatpost further into the seat tube (for a thicker saddle), or pulling it out (for a thinner saddle).

My summer bike is fitted with a Selle Italia SLR Boost Flow saddle (top) which has a stack height of 39mm vs the 47mm stack height of the saddle I use in the winter; a Selle Italia Novus Boost Flow. The SLR has a 'Flat' profile to enable an aggressively low torso angle whilst the Novus is 'Wavy' and provides support for an upright riding position.
Finally, it’s important to note that fore/aft adjustment of the saddle will affect your reach to the handlebars which we will consider further in the following paragraphs.
Consideration #7
Winter Bike Fit: Torso
The main impact on your torso during winter riding is likely going to be a conscious decision to have a more upright riding position which is inherently more comfortable and safer. A more upright position affords better viewing of the road hazards ahead and also improve your ability to deal with them.
This is because your upper body system is more relaxed and therefore has more compliance to deal with inputs (e.g. bump absorption where your relaxed arms and shoulders can better act as shock absorbers) and deliver outputs (e.g. quick steering actions to avoid obstacles).
A more upright torso can most easily be achieved by riding on the hoods or tops of the bars. But don’t neglect the drops. The drops are where you are most ‘locked in’ to your bike giving you the most secure position. It’s also the position where your access to the brake levers and the amount of power you can apply to them is at its greatest.
Finally, remember the wind? It’s the enemy of every cyclist and sadly is very prominent in winter. The aero tuck position allowed by riding in the drops can be very beneficial in beating that pesky headwind on the return to home (its always in your face on the way home, isn’t it? Even if it was in your face on the way out as well).
So, we don’t want to restrict your winter riding position to just the hoods or tops. This will usually mean a shorter stem and / or raised bar height. Bar height has little impact on the handling of your bike but a shorter stem will quicken the steering, going against the ‘slower’, more stable handling we want from our winter bike.
It’s worth bearing in mind that a lot of winter bikes, endurance bikes and gravel bikes already have a reduced ‘reach’ (the horizontal dimension between the bottom bracket and the top of the head tube), so it may well be that if you have purchased a dedicated bike for winter riding, it already has the ‘upright torso’ element nailed.
Consideration #8
Winter Bike Fit: Hands
Correct handlebar width is a very important consideration for your winter bike. Generally speaking, your bar width should be the same as the width between your shoulder joints (technically, the width of your shoulder girdle or even more technically the distance between your acromioclavicular joints).
So, if your shoulder joints are 40cm apart, you’d choose bars which measure 40cm centre to centre. But recent trends in cycling have pointed to both narrower and wider bars being recommended, often at the same time: Narrower for road racing, wider for endurance and gravel riding!
Gravel riding in particular has normalized handlebar ‘drop-flare’ where the bars widen from the hoods to the drops often by huge amounts (the 3T Superghiaia bars on my Officine Mattio Santiago Gravel Bike, for example, are 44cm at the hoods and a massive 52cm at the drops). The thinking here is that it provides a wider platform in your ‘locked in’ hand position to improve stability at speed.
On the flipside, this means your ‘most stable’ hand position is also your lowest hand position which goes against the proven Downhill-MTB logic of ‘high hand position = less crashing position’. Nothing is simple. In fact, it’s a compromise like everything in life and at Precision Cycle Fit we are always looking for that ‘Optimum Compromise’ or Sweetspot.
For winter road bikes, we’d always recommend a bar slightly wider than your summer road bike, maybe one or two sizes up. Thus if you normally ride a 40cm bar in the summer, increase this to 42cm or 44cm because it provides more stability which is important for confidence when the roads are slippery.
The stock bars on my 54cm Kinesis R2 Winter Bike in the photos are nearly as wide as my Gravel Bike bars at 44cm at the hoods and 50cm at the drops. This felt very weird to start with, but I’ve quickly got used to them and have no intention of trying anything narrower.
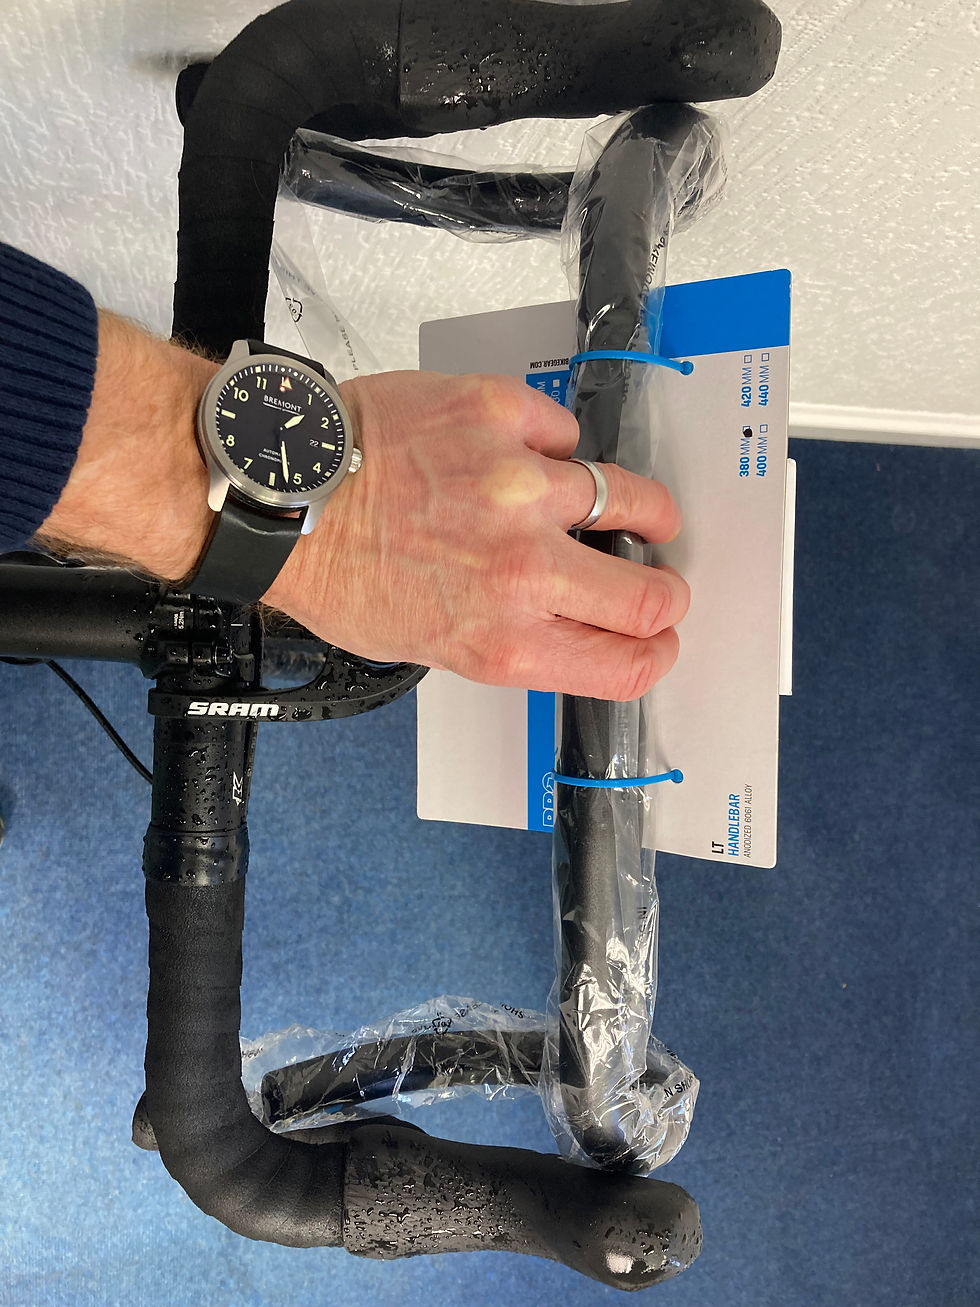
On the outside, the stock 44/50cm bars that came fitted to my 54cm Kinesis R2 (the 'drop-flare' is not noticeable on this photo). On the inside a set of Pro LT bars in a 38cm width.
From a purely physiological perspective, bars this wide could be considered a bad thing because the outward rotation of the elbows causes an inward rotation of the shoulders, which is more likely to result in tightness in the shoulders and neck which needs to be balanced with the benefits the extra width is providing.
Be aware that wider bars will also increase your effective reach to the hoods, and just as you were thinking bar width is complicated enough on its own, don’t forget the effect of cleat position, shoe stack, saddle fore/aft, short thickness, frame reach, stem length and bar height on your overall winter bike fit! It’s one big interlinked system.
Winter Bike Fit Summary
In summary, winter riding:
· Increases and reduces the effective saddle height.
· Increases and reduces the effective reach and stack of the handlebars!
Understanding all these elements does allow the home bike-fitter to attain a good winter riding position; after all its what most cyclists did before professional bike fitters appeared.
But if you really want to obtain the perfect winter bike fit, you really will benefit from seeking out a professional bike fitting service in Warwickshire. We would obviously be very pleased to see you here at Precision Cycle Fit and being based in Warwickshire, we are within 30 miles of the cities of Coventry, Leicester, Northampton, Milton Keynes, Oxford and Birmingham with excellent motorway accessibility (M1, M6, M40, M42, M69).
Next Time...
I hope you have enjoyed reading my views on How to Get the Best Winter Bike Fit. Please do get in touch if you have any questions or would like to book a bike fitting. Next weeks’ Blog will follow logically with tips on choosing your winter bike. Or maybe something else"! Hit the subscribe button to get this in your in-box.
Thanks, Matt
Comentarios